 Save to Pinterest
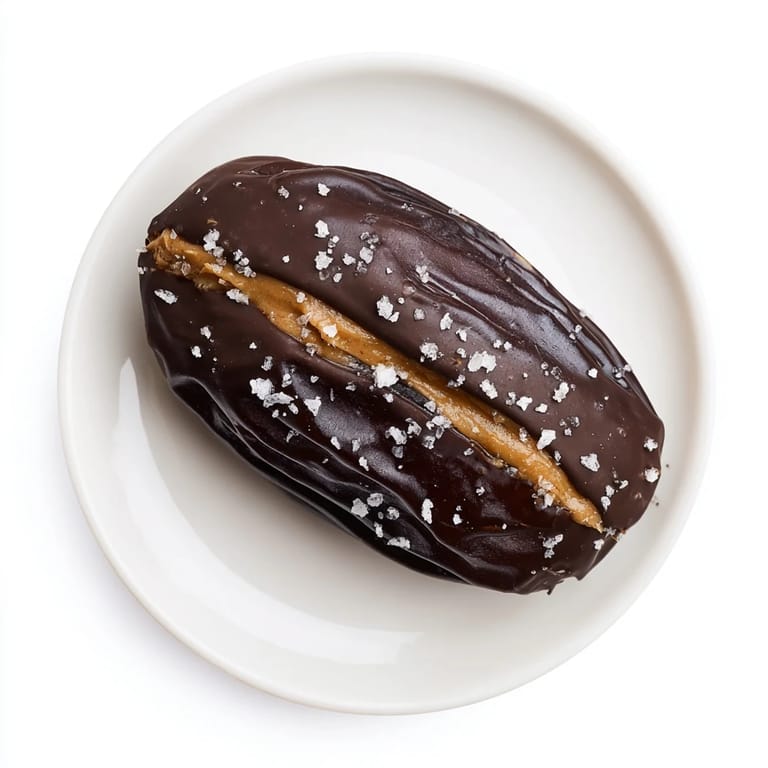
 I discovered these dates on a Tuesday afternoon when I was rummaging through my pantry looking for something sweet but not too indulgent. There they were—a bag of plump Medjool dates I'd forgotten about—and suddenly I remembered my neighbor mentioning how she stuffs hers with peanut butter and dips them in chocolate. It sounded decadent, almost too simple to work, but I had to try. Twenty minutes later, I was holding something that tasted like fancy homemade candy, and I realized I'd just found my new favorite way to satisfy that 3 o'clock craving.
I made a batch for a book club meeting, tucking them into a little wooden box wrapped in kraft paper, and watched three people reach for seconds without asking what was in them. One friend asked if they were store-bought, which somehow felt like the highest compliment. That's when I knew this recipe had staying power.
Ingredients
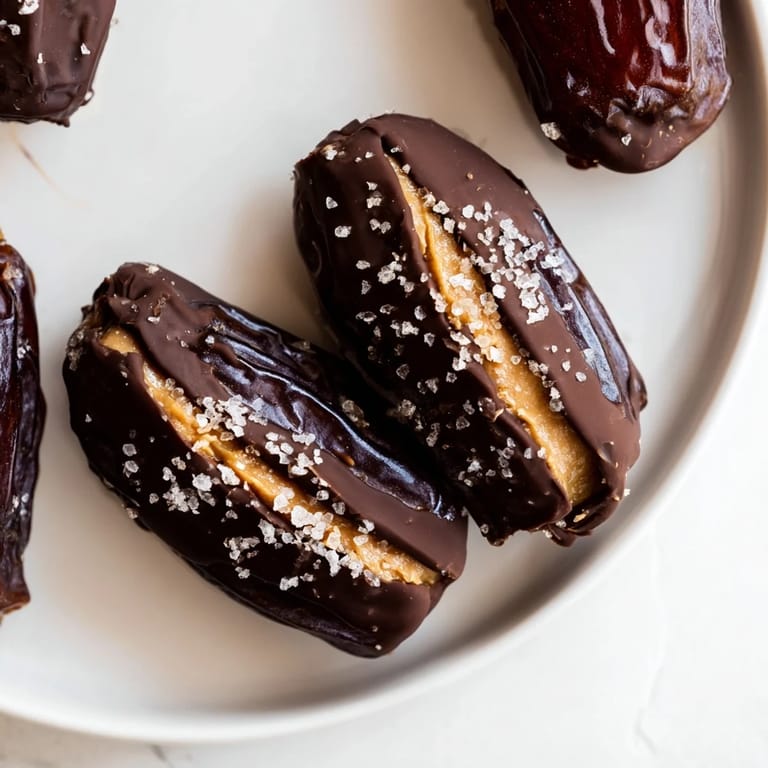
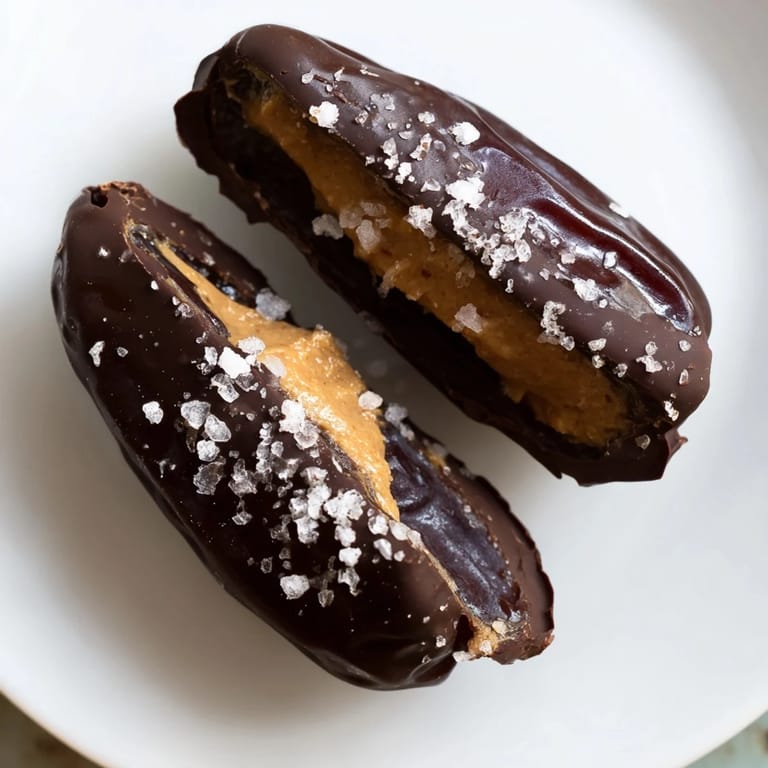
- Medjool dates, pitted: These are the sweet, meaty ones that hold their shape beautifully. Avoid the smaller deglet noor varieties—they're too delicate and won't cradle the filling as generously.
- Creamy peanut butter: Natural or conventional both work, but make sure it's thick enough to stay inside the dates without oozing out. If yours is too runny, it won't cooperate.
- Dark chocolate, chopped: Aim for at least 60% cocoa so you get that sophisticated, slightly bitter note that balances the sweetness of the dates and peanut butter.
- Coconut oil: This keeps the chocolate silky and dip-able, but it's truly optional—your chocolate will still coat beautifully without it.
- Flaky sea salt: The finishing touch that makes people pause and say, 'Wait, what is that?' The salt hits at just the right moment, before your brain registers the sweetness.
Tired of Takeout? 🥡
Get 10 meals you can make faster than delivery arrives. Seriously.
One email. No spam. Unsubscribe anytime.
Instructions
- Prepare your dates:
- Slice each date lengthwise on one side, just deep enough to create an opening, then gently pop out the pit with your thumb. You want the date to stay mostly whole—think of it as creating a little pocket rather than splitting it in half.
- Fill with peanut butter:
- Spoon roughly half a tablespoon of peanut butter into each date's opening, then gently press the two sides back together. Don't worry if a tiny bit squeezes out—that just means your dates are generous.
- Melt the chocolate:
- In a microwave-safe bowl, heat your chopped chocolate and coconut oil (if using) in 30-second bursts, stirring between each pulse. You'll know it's ready when it's silky and glossy, with no lumps left behind.
- Dip with intention:
- Using a fork, gently lower each stuffed date into the melted chocolate, rotating it to coat all sides evenly, then lift it out slowly and let the excess drip back into the bowl. This is where patience pays off—rushing this step means chocolate puddles instead of elegant coating.
- Top and chill:
- Place your chocolate-coated dates on parchment paper, then immediately sprinkle with flaky sea salt while the chocolate is still wet and sticky. Slide the whole tray into the fridge for at least 10 minutes until the chocolate firms up completely.
 Save to Pinterest
 I'll never forget my five-year-old nephew biting into one of these at a family gathering and declaring it 'fancy candy.' There's something about food you made yourself that somehow tastes even better when someone else's eyes light up.
The Beauty of No-Bake Desserts
Making these doesn't heat up your kitchen or require you to stand over an oven, which is exactly why I reach for this recipe on warm days when turning on the oven feels wrong. There's something liberating about creating dessert in just the time it takes to organize your ingredients and melt chocolate. It also means you can make these whenever a craving strikes, without any real planning ahead.
Customizing Your Dates
The beauty of this recipe is how willing it is to bend to your preferences. I've made versions with almond butter for a lighter flavor, tried sunflower seed butter for a friend with peanut allergies, and once experimented with mixing peanut butter with a tiny bit of maple syrup for extra depth. My sister swears by adding a single roasted peanut inside each date before closing it up—you get that textural surprise of crunch against the soft filling and chocolate.
Storage and Serving Ideas
These keep beautifully in the fridge for up to a week, tucked into an airtight container where they won't absorb other flavors. I've found they're best served slightly chilled—not ice-cold from the fridge, but cool enough that the chocolate snaps cleanly when you bite into it. Pack them in little paper cups for gift-giving, or arrange them on a platter with fresh berries for a dessert spread that looks far more complicated than it actually was.
- Make a double batch and freeze them for up to three weeks if you want an emergency dessert on hand.
- These disappear quickly at parties, so don't be surprised if you need to make more than one batch.
- Experiment with drizzling white or milk chocolate over the dark chocolate coating for a fancier presentation.
 Save to Pinterest
 These little bites have become my answer to 'What's something I can bring?' for every gathering, and honestly, I don't think I'll ever stop making them. They're proof that sometimes the simplest recipes deliver the most satisfaction.
Recipe FAQs
- → Can I use almond butter instead of peanut butter?
Yes, almond butter makes a delicious alternative and offers a different nutty flavor while maintaining a creamy texture.
- → What type of chocolate works best for coating?
Dark chocolate with at least 60% cocoa provides a rich taste that balances the sweetness of the dates and peanut butter.
- → How do I ensure the chocolate coating is smooth?
Melting chocolate with a small amount of coconut oil in short intervals helps achieve a smooth, shiny consistency for dipping.
- → How should I store these treats?
Store them in an airtight container in the refrigerator for up to one week to keep the chocolate set and flavors fresh.
- → Can I use other types of dates?
Large, soft Medjool dates are preferred for their sweetness and size, but other soft varieties can work if pitted carefully.