 Save to Pinterest
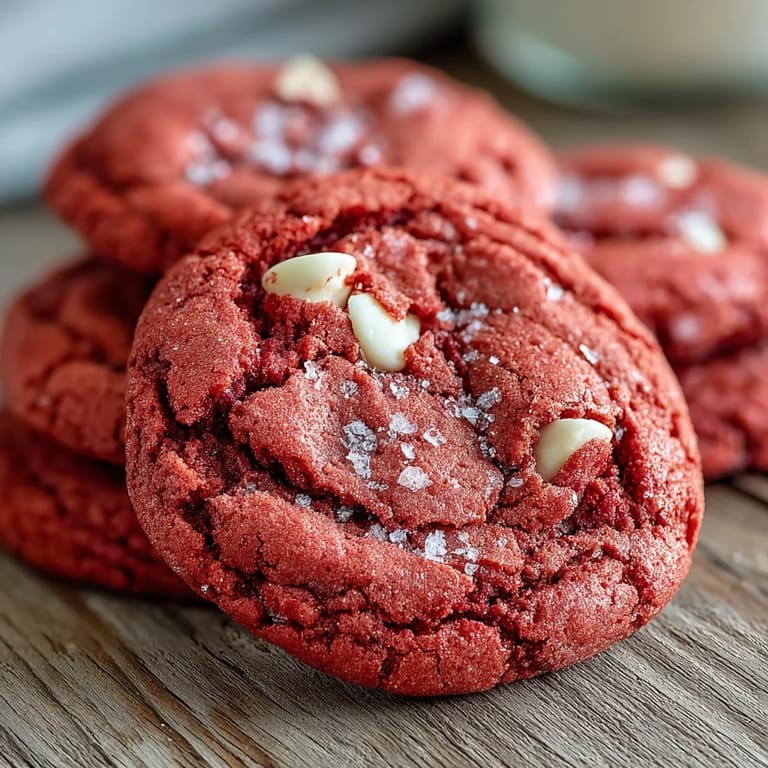
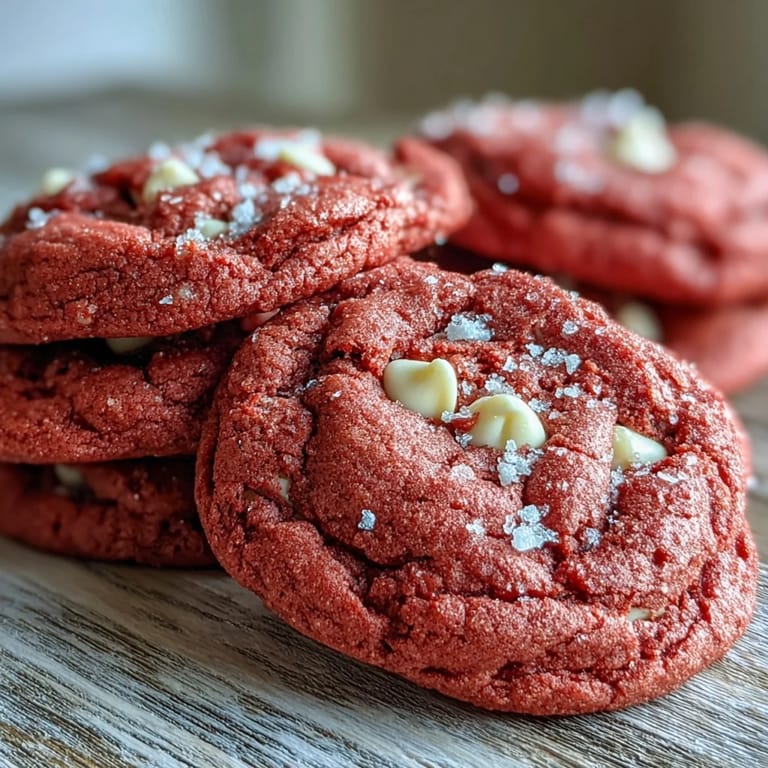
 My daughter walked into the kitchen one Saturday morning and announced she wanted cookies that looked like happiness. I laughed, but she was serious, pointing at a bottle of pink food coloring tucked in the pantry. We spent the next hour turning a simple cookie dough into something that made us both smile before we even tasted it. The white chocolate chips against that soft pink were exactly what she meant.
I brought a batch to a potluck once, and three people asked if I used a box mix because they looked so bright and perfect. When I said I made them from scratch, the requests for the recipe started immediately. There is something about a pink cookie that breaks the ice faster than any small talk.
Ingredients
- All-purpose flour: This gives the cookies their soft, chewy structure, and I always spoon it into the measuring cup rather than scooping directly to avoid packing it down.
- Baking powder and baking soda: The combination makes these cookies rise just enough to stay tender in the center while the edges set beautifully.
- Salt: A small amount balances the sweetness and makes the flavor more complex.
- Unsalted butter: Softened to room temperature, it creams perfectly with the sugar and gives the cookies their rich, buttery flavor.
- Granulated sugar: This sweetens the dough and helps create those slightly crisp edges I love.
- Egg: One large egg binds everything together and adds moisture.
- Vanilla extract: Pure vanilla makes the whole batch smell like a bakery.
- Pink gel food coloring: Gel works better than liquid because it does not thin the dough, and you can control the shade easily.
- White chocolate chips: They melt just a little during baking and create pockets of creamy sweetness.
Tired of Takeout? 🥡
Get 10 meals you can make faster than delivery arrives. Seriously.
One email. No spam. Unsubscribe anytime.
Instructions
- Mix the dry ingredients:
- Whisk the flour, baking powder, baking soda, and salt together in a medium bowl. Set it aside while you work on the wet ingredients.
- Cream the butter and sugar:
- Beat the softened butter and sugar with a mixer until the mixture turns pale and fluffy, about 2 to 3 minutes. This step adds air and makes the cookies tender.
- Add the egg and color:
- Beat in the egg and vanilla until smooth, then add the pink gel food coloring. Mix until the color is even and vibrant.
- Combine wet and dry:
- Gradually add the dry ingredients to the wet mixture on low speed, mixing just until no flour streaks remain. Overmixing makes cookies tough, so stop as soon as it comes together.
- Fold in the chips:
- Use a spatula to gently fold in the white chocolate chips. I always add a few extra on top of each cookie before baking for a prettier finish.
- Chill the dough:
- Cover the bowl with plastic wrap and refrigerate for 30 minutes. This keeps the cookies from spreading too much in the oven.
- Prepare for baking:
- Preheat your oven to 350°F and line two baking sheets with parchment paper. The parchment prevents sticking and makes cleanup easy.
- Shape the cookies:
- Scoop tablespoon-sized balls of dough and place them 2 inches apart on the baking sheets. They will spread just enough during baking.
- Bake until set:
- Bake for 10 to 12 minutes, until the edges are set but the centers still look soft. They may seem underbaked, but they will firm up as they cool.
- Cool completely:
- Let the cookies cool on the baking sheets for 5 minutes, then transfer them to a wire rack. This prevents the bottoms from getting soggy.
 Save to Pinterest
 The first time I made these, my neighbor knocked on the door just as I pulled them from the oven. She stayed for coffee and left with half the batch wrapped in foil. Now she texts me whenever she has a bad day, asking if I have any pink cookies left.
Storing Your Cookies
These cookies stay soft and chewy for up to a week when stored in an airtight container at room temperature. I sometimes slip a piece of bread into the container to keep them from drying out, an old trick my grandmother taught me. If you want to freeze them, layer them between sheets of parchment paper and freeze for up to three months.
Flavor Variations
You can add half a teaspoon of almond extract for a subtle floral note, or a few drops of rose water if you want something more delicate. I have also swapped the white chocolate chips for dark chocolate when I wanted a less sweet version. The pink color works with almost any flavor you can imagine.
Serving Suggestions
These cookies are perfect on their own with a glass of cold milk, but I have also sandwiched them with cream cheese frosting for birthdays. They look beautiful stacked on a plate at parties, and kids love decorating them with sprinkles before baking.
- Serve them warm with a scoop of vanilla ice cream for an easy dessert.
- Pack them in clear bags tied with ribbon for homemade gifts that actually get eaten.
- Pair them with hot tea or coffee for an afternoon pick-me-up.
 Save to Pinterest
 Every time I make these, someone asks for the recipe, and I am always happy to share it. There is something about a cookie that looks this cheerful that makes people smile before they even take a bite.
Recipe FAQs
- → Why is my cookie dough too sticky to handle?
The dough needs proper chilling time for 30 minutes to firm up. If it's still too sticky after refrigerating, place it in the freezer for an additional 10-15 minutes. The flour amount in this recipe is carefully measured for the right consistency.
- → Can I use liquid food coloring instead of gel?
Gel food coloring is recommended because it provides vibrant color without adding excess liquid that could affect the dough's texture. If using liquid coloring, you may need to reduce it by half and add slightly more flour to compensate.
- → How do I know when the cookies are done baking?
The cookies are ready when the edges are set and lightly golden, but the centers still appear slightly soft and underbaked. They will continue cooking on the hot baking sheet during the 5-minute cooling period, resulting in perfectly chewy cookies.
- → Can I freeze the cookie dough?
Yes, scoop the dough into balls and freeze on a baking sheet until firm, then transfer to a freezer bag for up to 3 months. Bake frozen dough balls for 12-14 minutes, adding 1-2 extra minutes to the baking time.
- → Why did my cookies spread too much?
Excess spreading usually happens when the dough isn't chilled enough or the butter was too soft before mixing. Always refrigerate for the full 30 minutes and ensure your butter is softened, not melted or greasy.
- → Can I make these gluten-free?
Yes, substitute the all-purpose flour with a 1:1 gluten-free flour blend that contains xanthan gum. The texture may be slightly different but still delicious. The chilling step becomes even more important with gluten-free flour.